Deploying a snapshat filter to the browser
How to deploy a ML model without worrying about a cloud pipeline.
TL;DR In this article I explain how you can deploy a model directly to the browser from pytorch by using Onnjx. This work was done a year ago in about two weeks time.
Deploying a cool deep learning demo at zero cost.
Ok, so when we are showcasing deep learning, usually that implies running models somewhere on the cloud. Sometimes, running these models is by itself quite costly. GPT-3 cost something like 10 million to train, but imagine how much it will cost to run if it was accessible to the general public !
One technique applicable so small machine learning models, it to actually make to client run the model not you. This means that your front can be a simple static website. Hell you could even host it on Github for free !
Background
About a year ago, I was working at Nabla (They pivoted since). We were looking at how performant was 3d pose estimation of the face. It means models detecting faces with depth which was not as ubiquitous as regular 2d face detection.
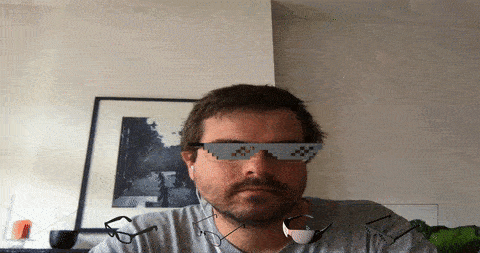
The idea was to see how hard it was to fit glasses on the fly to customers. The whole thing lasted for 2 weeks, so mind the lack of polish.
Let’s get started with 3DDFA
So 3DDFA is an improved Pytorch implementation of this paper. We settled on that implementation because it was the best available at the time.
How does it work ?
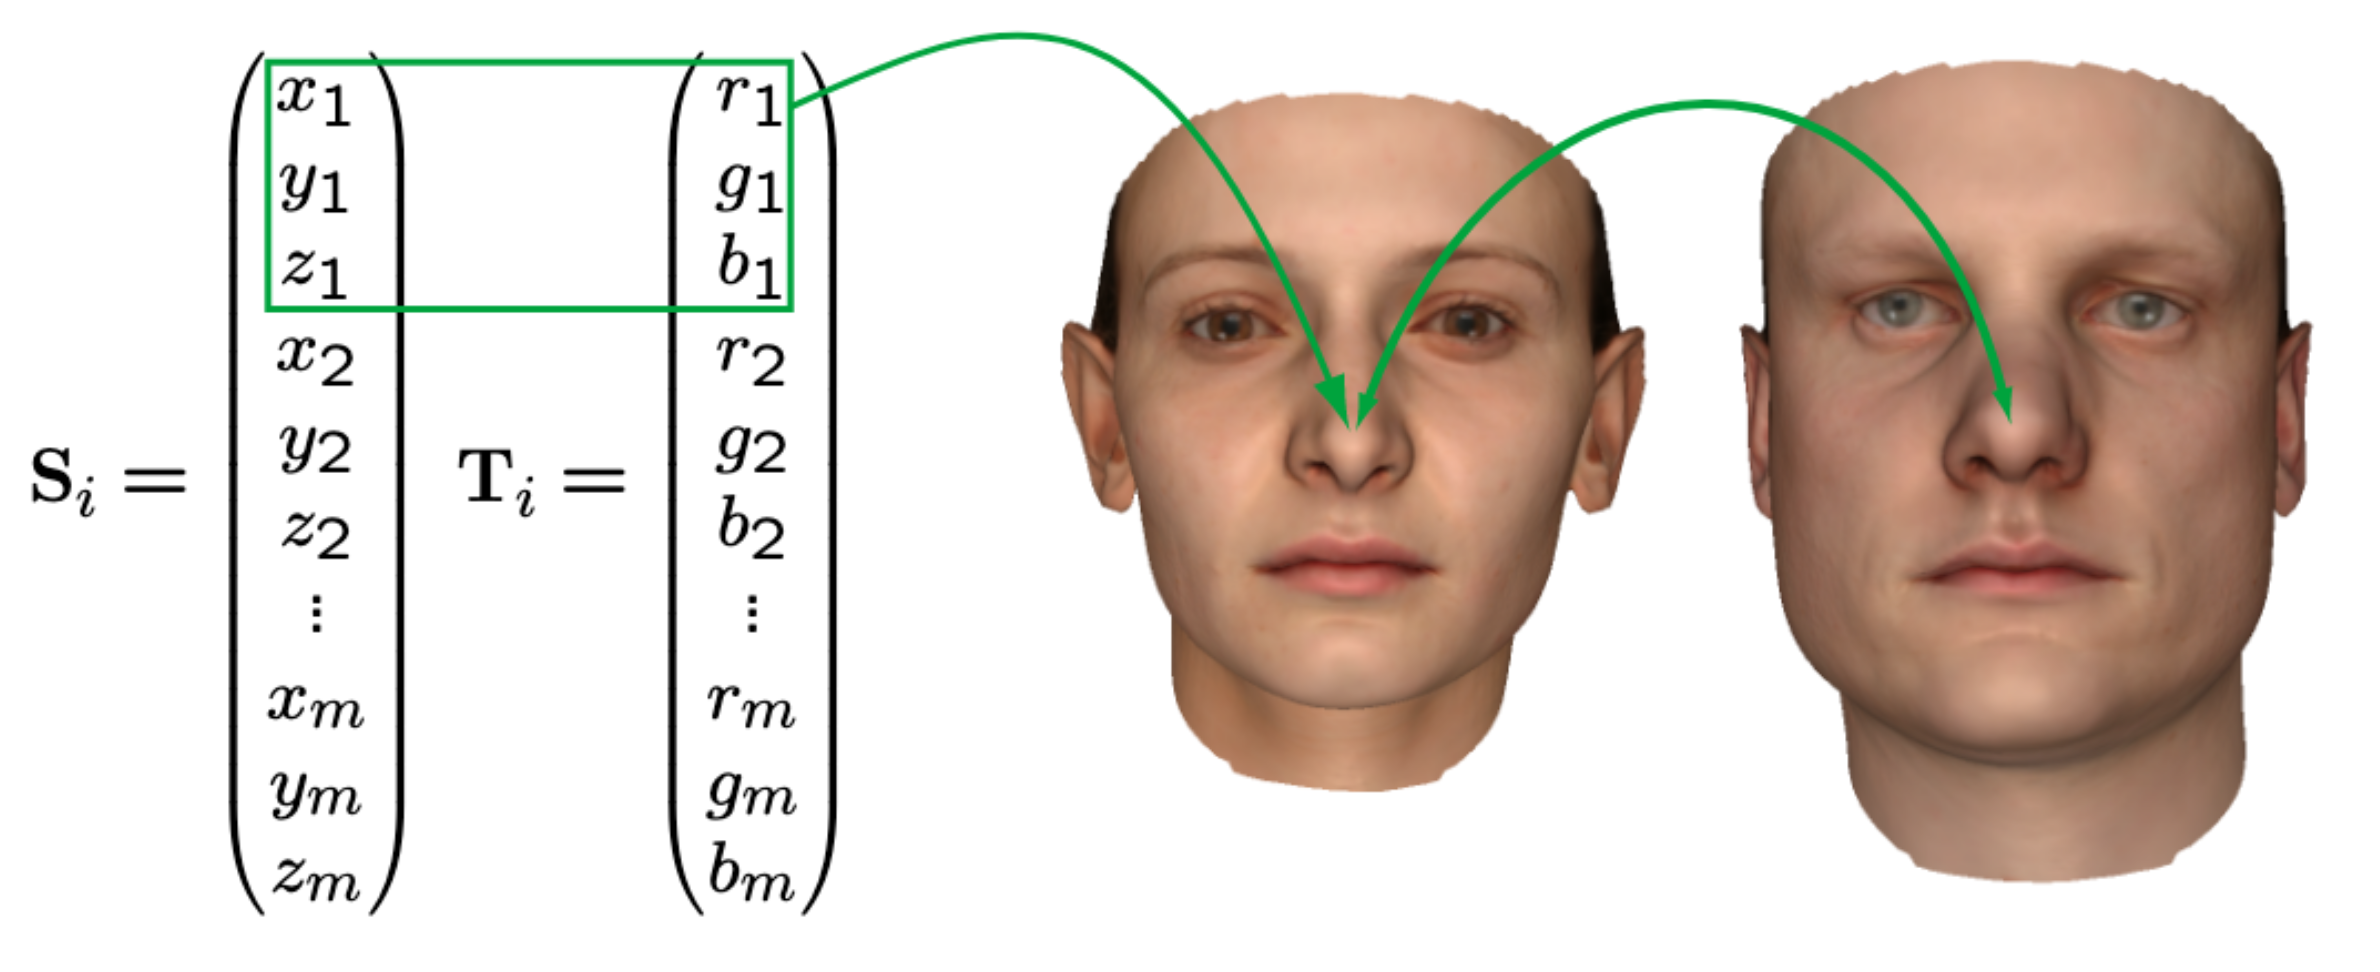
Most 3d pose estimation use the same tricks. First you need a good space representation with few latent variables. That is usually taken by creating a quite large dataset of a lot of people in lots of different poses and doing a very large PCA on this representation.
For faces, 3ddfa uses a mix of BFM and Facewarehouse, for the full human body, SMPL is often used.
In the face case, all 3D scans register the same 53490 vertices on the difference faces of the different participants (100 male and 100 female for BFM). For instance the center nose vertex:
Then we have the same participants, with different expressions:
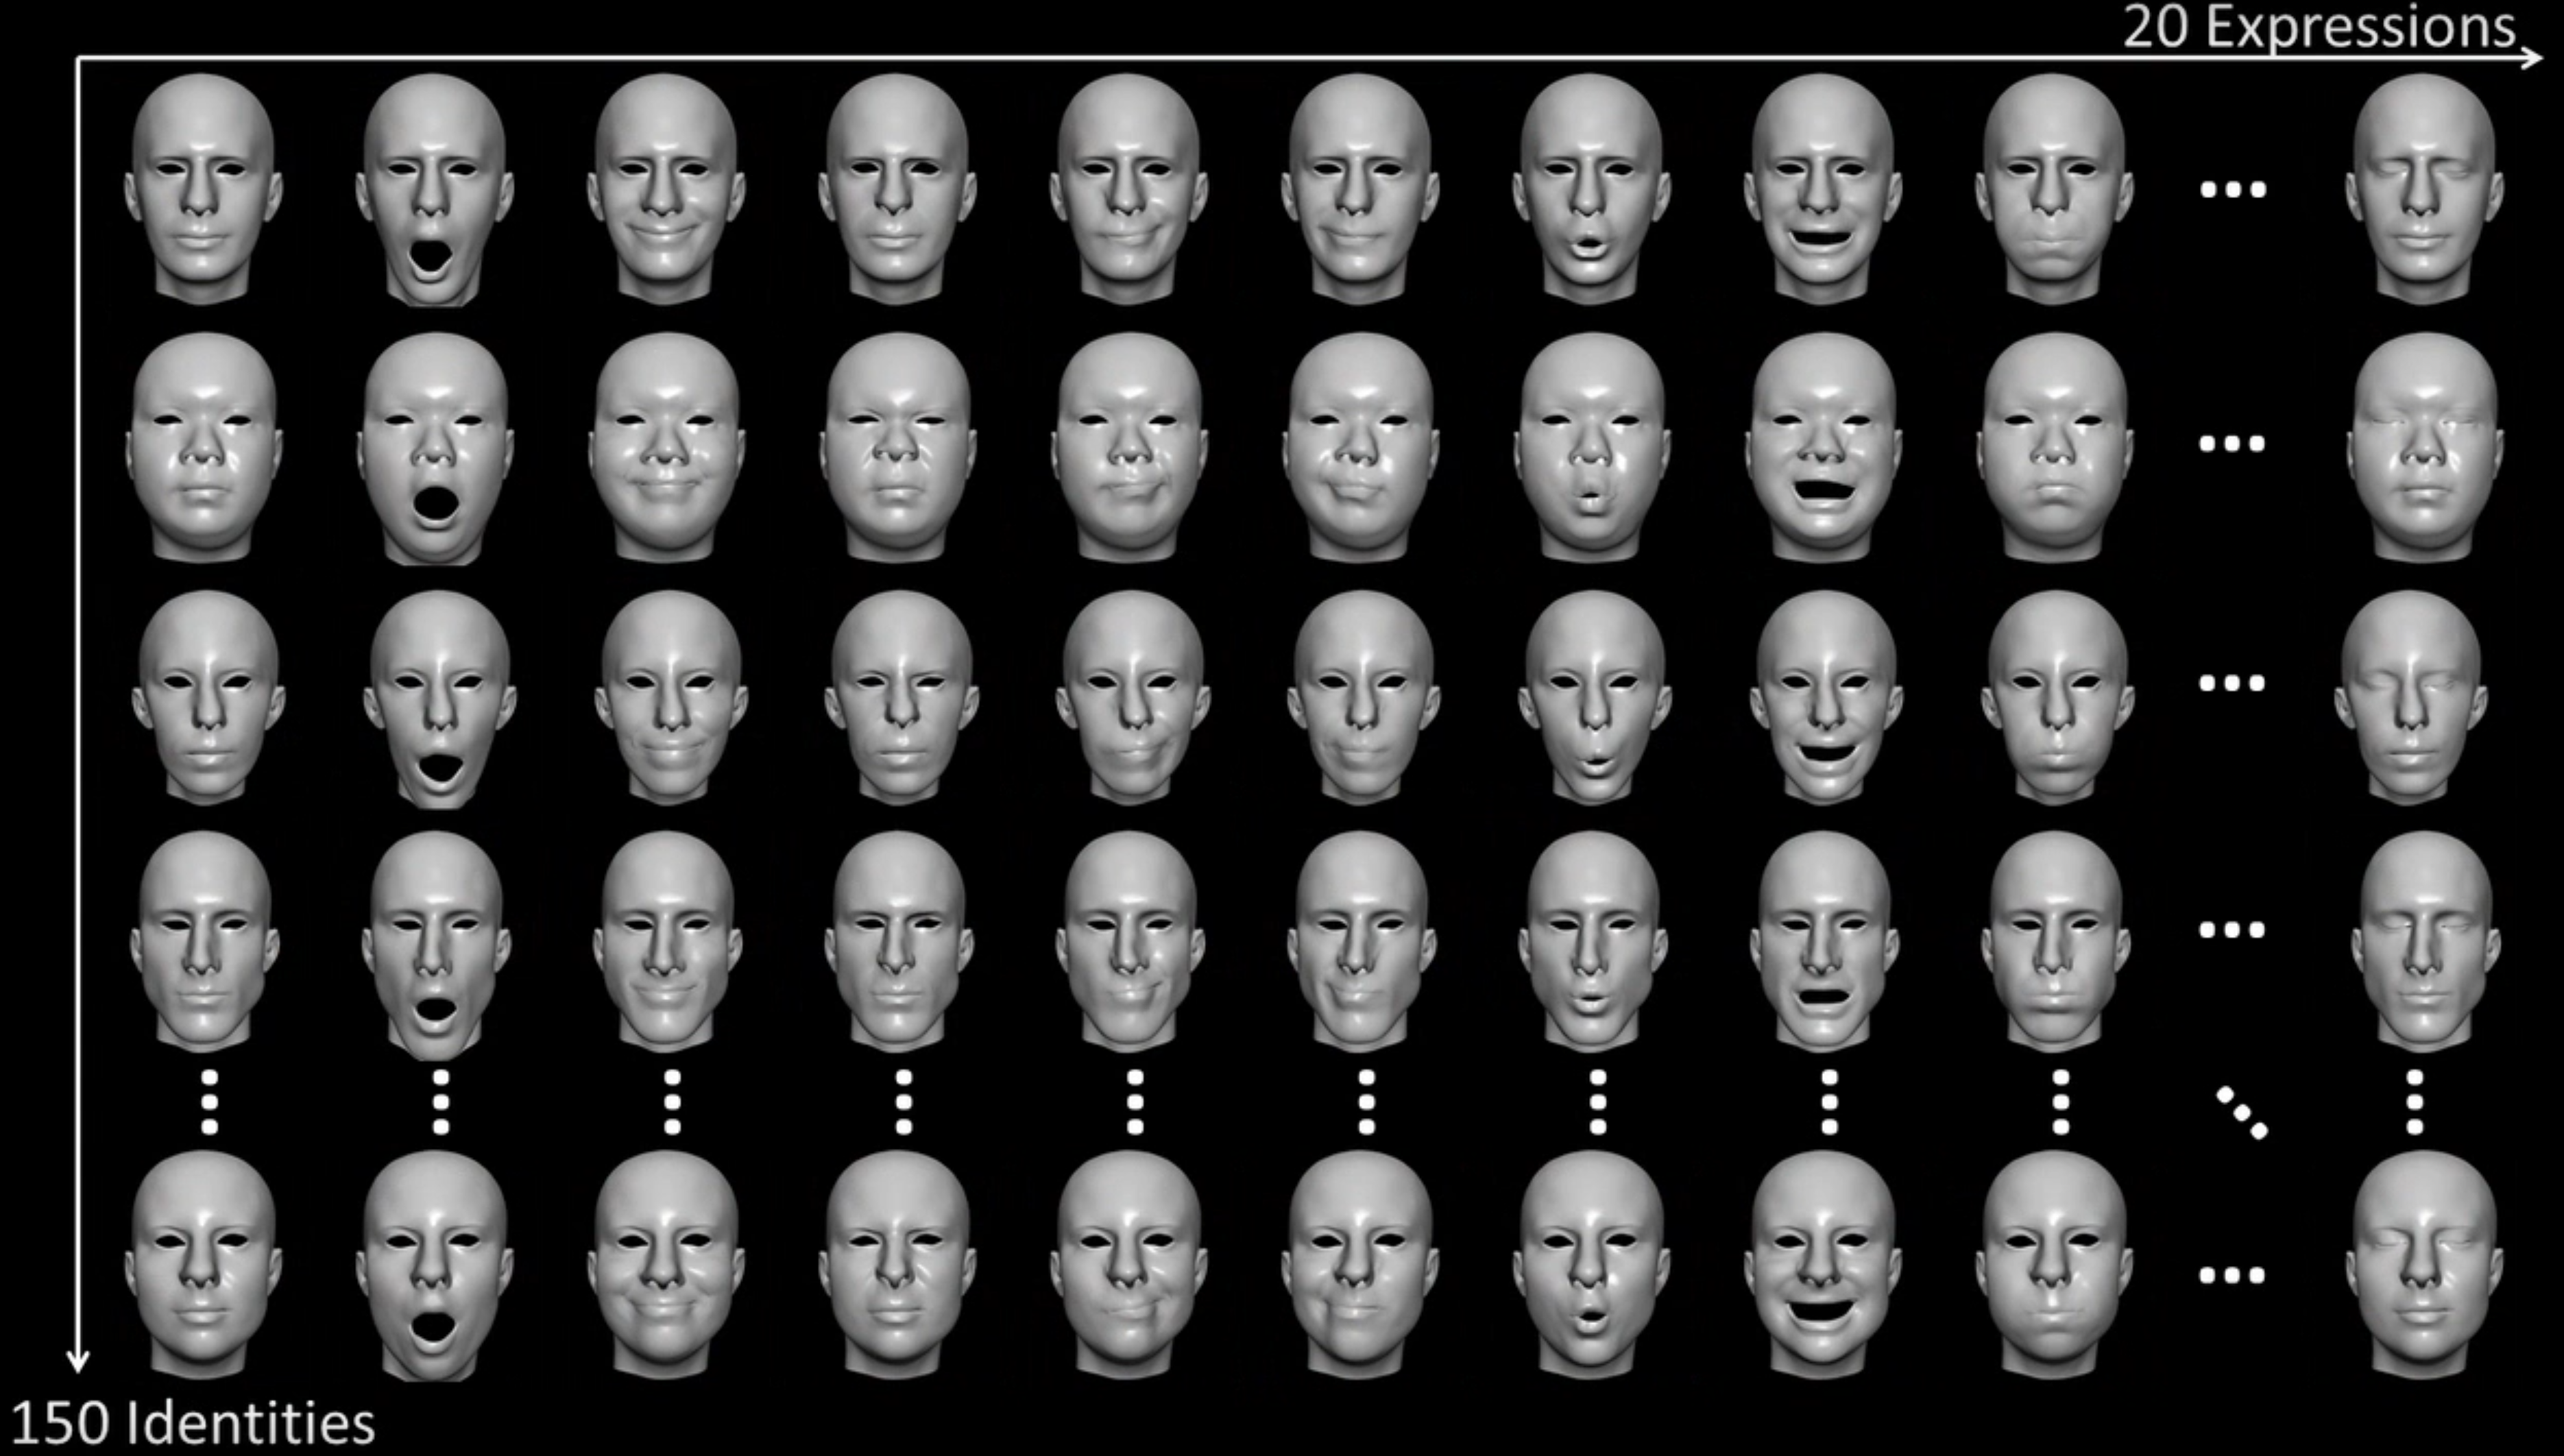
Overall we end up with 150 participants x 20 poses x 53490 vertices (3 reals). We can then use a PCA to reduce the dimensionality into 2 orthogonal spaces, one for the shape and the other for the expression of a face. Such that any face can be expressed as.
\[M_{target\ face} = N_{neutral\ face} + \underbrace{S_{params} * S_{shape}}_{\text{Person identity}} + \underbrace{W_{params} * W_{expression}}_{\text{Smile or neutral expression}}\]Actually we’re missing a global orientation of the face which can be represented as a rotation matrix and a scaling factor and an offset, which we will just express as a single matrix $ R $, and a vector $ p $.
\[M_{target\ face} = R \times ( N_{neutral\ face} + S_{params} * S_{shape} + W_{params} * W_{expression}) + p\]The 3DDFA model, will actually predict from a photo $ R $, $S_{params}$, $W_{params}$ and $p$. For reference, R is 9 floats, $S_{params}$ is 40 floats, $W_{params}$ is 10 floats, and $p$ is 3 floats. So the actual model of 3DDFA takes a 120x120 pixels image and returns a 62 vector that represents the face.
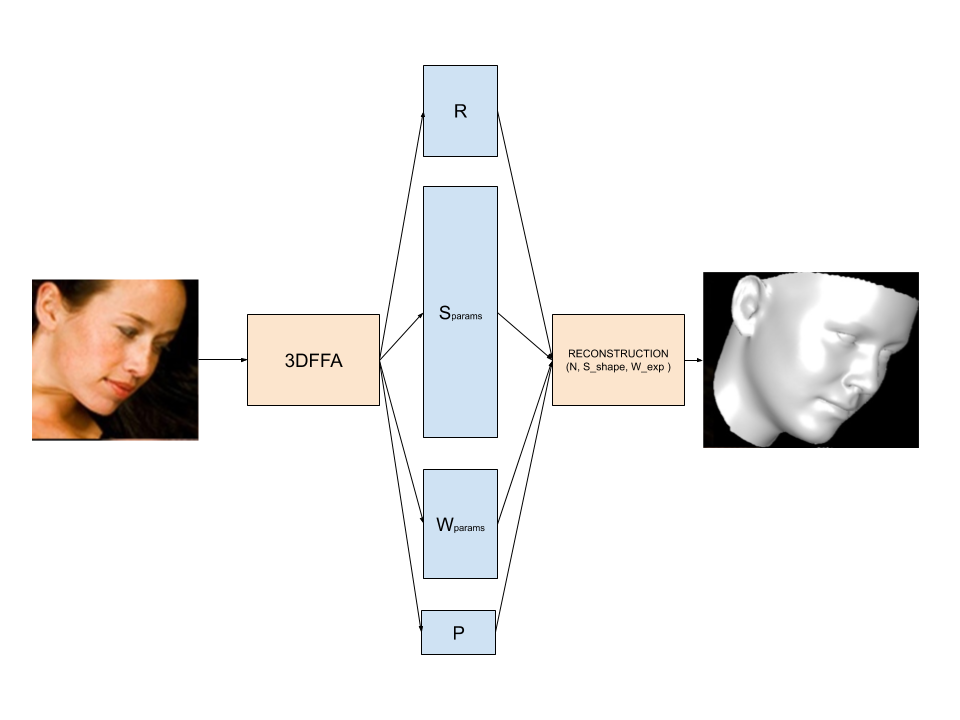
The actual architecture of 3ddfa is actually just a simple mobile net.
Let’s port the model to the browser.
Ok, so let’s isolate the first few lines in main.py that load the model.
import torch
import mobilenet_v1

# 1. load pre-tained model
checkpoint_fp = 'models/phase1_wpdc_vdc.pth.tar'
arch = 'mobilenet_1'

checkpoint = torch.load(checkpoint_fp, map_location=lambda storage, loc: storage)['state_dict']
model = getattr(mobilenet_v1, arch)(num_classes=62)  # 62 = 12(pose) + 40(shape) +10(expression)

model_dict = model.state_dict()
# because the model is trained by multiple gpus, prefix module should be removed
for k in checkpoint.keys():
    model_dict[k.replace('module.', '')] = checkpoint[k]
model.load_state_dict(model_dict)
Now let’s add a few lines to export the model to Onnx
# Batch size, C, H, W
dummy_input = torch.zeros((1, 3, 120, 120) )

torch.onnx.export(model, dummy_input, "3ddfa.onnx", verbose=True, input_names=["input"], output_names=["params"])
Ok good, now we have a 3ddfa.onnx file model in our directory.
Let’s try to run it in the browser by following OnnxJS Getting Started and write a index.html file:
<html>
  <head> </head>

  <body>
    <!-- Load ONNX.js -->
    <script src="https://cdn.jsdelivr.net/npm/onnxjs/dist/onnx.min.js"></script>
    <!-- Code that consume ONNX.js -->
    <script>
      // create a session
      const myOnnxSession = new onnx.InferenceSession();
      // load the ONNX model file

      function getInputs(){
          const x = new Float32Array(1 * 3 * 120 * 120).fill(1);
          const tensorX = new onnx.Tensor(x, 'float32', [1, 3, 120, 120]);
          return [tensorX];
      }

      myOnnxSession.loadModel("./3ddfa.onnx").then(() => {
        // generate model input
        const inferenceInputs = getInputs();
        // execute the model
        myOnnxSession.run(inferenceInputs).then((output) => {
          // consume the output
          const outputTensor = output.values().next().value;
          console.log(`model output tensor: ${outputTensor}.`);
        });
      });
    </script>
  </body>
</html>
Now let’s run a local server with python -m http.server and go to http://localhost:8000 to see your console.
Woops ! We got an error : Uncaught (in promise) TypeError: cannot resolve operator 'Shape' with opsets: ai.onnx v9.
Actually onnx.js cannot infer dynamic shapes the same way PyTorch can. We can edit that by hardcoding
some values within a Reshape (which is supported).
In mobilenet_v1.py line 144, edit x = x.view(x.shape(0), -1) into x.view(1, 1024). Now re-export your onnx file.
It’s working ! (Well we have values.)
Putting that model in an actual demo product.
Ok so this is a bit more intensive work, so we’re not going to detail every part, but focus on the most important parts.
Get the webcam data
var that = this
if (navigator.mediaDevices.getUserMedia) {
  navigator.mediaDevices.getUserMedia({video: {facingMode: 'user'}})
    .then(function(stream) {
            that.video.srcObject = stream;
            that.video.play().then(() => {
                    // That draws the video on a canvas.
                    that.facedetector.loadModel()
                    that.loop()
            }).catch((e) => {
                alert("Error launching webcam " + e)
            });

    }).catch(function(e){
        alert("No webcam detected " + e);
    });
}
Get the 3d faces from the image
We’re using face detector to get where the faces are on the current image, then run our model on each face in the image.
var ctx = outcanvas.getContext('2d')!;
const detections = await faceapi.detectAllFaces(
  incanvas,
  new faceapi.TinyFaceDetectorOptions(),
);

var vertices = [];
for (i = 0; i < detections.length; i += 1) {
  var detection = detections[i];
  // We get a 1x3x120x120 Tensor here.
  // We could batch that in theory, but simplicity here.
  const inferenceInputs = this.getInputs(incanvas, detection);
  const outputData = await this.session!.run([inferenceInputs]);
  const output = outputData.values().next().value;

  // We need a reconstruction.
  const face_vertices = this.reconstruct68(output);

  // Ellipsed code where we fuse various meshes to only run a single rotation
  // and render process (we need to render to occlude the glasses in 3d with
  // a transparent mesh of the face.
}

ctx.drawImage(incanvas, 0, 0);
// Drawing back the occluded glasses on the webcam canvas.
this.drawGlasses(this.scene, outcanvas);
Reconstruct the vertices.
As it turns out the Rotation ($R$) + Offset ($p$) we’ve seen in the first part is not really what it seems, $R$ is just a 3x3 matrix, nothing forces it to be rotation (meaning determinant 1). As it turns out the model, changes the determinant of this matrix quite heavily throughout time. Using it as is within our demo, would mean that glasses would grow large, then small and get deformed all the time.
In order to fix this, we could fix the model of course, but it would require recreating a dataset, changing the loss functions and so on. But that’s at least a full week to run that, and nothing guarantees that it would work. It could still fail because the morphable model lacks expressability, or you can’t recreate the dataset because of some other issues and so on. That’s of course the best course of action for a full featured product. But it won’t ship fast.
A much easier way is to recover the real rotation, scale and offset by running a small gradient descent loop locally, we know they exist because a real face does not change scale across time, rotation and offset tend to get small changes frame to frame.
So what we’re going to do, is reconstruct 68 vertices from the faces from the model. (we need more that 3 to stabilise the solution, 53k is way overboard) and solve the equation \(\text{face vertices} = R \times s \times \text{glass vertices} + p\).
That’s 13 params (9 + 1 + 3) for 68 equations. Inverting that system is not very practical as far as I know in javasript, so we’re going to simply run a gradient descent. It should be faster than inversion on subsequent updates (when the solution is close to the previous solution).
The full code is a bit scary looking (definitely not the way I would solve this now) but mostly amounts to manually working the gradient steps.
Add glasses on that model.
If we added the glasses mesh right away, we would have an occlusion problem where the back branch would show on top of your face. What we’re going to do is to have a grouped mesh of the glasses and a transparent face (we’ll use a mean normal face to keep computation low) so that the 3d rendering will occlude the back branch of the glasses.
Adding the general face:
public add_face(transparent?: boolean) {
  if (transparent === undefined) {
    transparent = true;
  }
  const self = this;
    this.scene.load(process.env.PUBLIC_URL + '/3dmodels/face.fbx').then(face => {
    if (transparent) {
      const mesh = face.children[0] as THREE.Mesh;
      mesh.renderOrder = -1;
      const material = mesh.material as THREE.Material;

      // Makes the face occluding, but we write the background
      // Color, so alpha instead of texture.
      material.colorWrite = false;
    }
    self.add(face);
    self.reset_clones();
  });
}
Adding the glasses
public addElement(element: string) {
  this.group.add_element(process.env.PUBLIC_URL + `/3dmodels/${element}.fbx`);
}
The whole pipeline is a bit complex to reuse meshes and run the thing efficiently (still pretty messy code) but that’s the gist, add the 2 meshes on the same scene, and hit render. Actually, we add all the faces and all the glasses to the same global scene and render only once.
Conclusion
So we’ve seen how we put a model from a working paper code, into an actual product. It necessary to remember to understand how the paper actually works vs pretends to work is important, it was super important here to understand the $R$ and $p$ and $s$ factors into our reconstruction. It also demonstrates that the paper’s authors didn’t realize that what they thought was a pose actually contains a lot of distortion, so it does not work how they expected.
It also shows that putting ML in a product even for a very simple demo requires understanding many other technologies. Here it meant getting the webcam feed, getting Onnx layers simplfied, understanding Three.js to master occlusion, etc… But by going full browser you can put your demo out and never worry about the cost !
Check out the Full source code for all the quirks.